Wednesday, December 11, 2013

Taro White Chocolate Chip Cookies


Yay! Cookies!! This is my first year participating in the Great Food Blogger Cookie Swap. What's better than receiving 3 dozen cookies from bloggers across the country!? Let me tell ya...nothing! :)


I received a dozen Peanut Butter Chippers from Sara at Sara Ran Away with the Spoon, a dozen Peppermint Mocha Cookies from Lauren at Making Life Sweet, and I received a dozen Hot Fudge Thumbprint Cookies with Caramel Drizzle from Meghan at The Tasty Fork.


So when you guys looked at the photo of my cookies…were you like…why are they purple? Or was the color a clue for some of you?

Have you guys ever heard of taro? What about bubble tea?

I fell in love with the taro flavor by drinking bubble tea. Bubble tea is a drink either iced or blended, available in many different flavors, and include little tapioca pearls (bubbles). Taro is my favorite flavor of bubble tea and it comes in this lovely shade of purple. Taro is actually a root vegetable and has a natural light purple color, to me it’s kind of like a nutty vanilla flavor. Bubble tea was created in Taiwan and it is available in some restaurants, there is a great little Thai place next to my office that has a small bubble tea room in the back, but you can also find it in some coffee houses and cafes.


I used a taro powder that I ordered off the interwebs in my cookies. It’s actually a mix that I can make my own taro bubble tea with. I also have some tapioca pearls and fat straws in case I ever get a craving. This is what the taro powder looks like.


This is not the same brand of taro powder I used, as I can't remember where I ordered it from, but I found a pretty picture to show you from a company (Bossen) that sells it. 


Taro White Chocolate Chip Cookies
Ingredients:
1/2 cup (1 stick) butter, room temperature
1/2 cup granulated sugar
1/2 cup brown sugar
2 eggs, room temperature
1 tsp vanilla extract
1/2 tsp almond extract
2 cups flour
1 cup taro powder
1 tsp baking soda
1/2 tsp salt
1 cup white chocolate chips

Directions:
1.  Preheat oven to 325 degrees, and line a cookie sheet with parchment paper.

2.  In the bowl of a stand mixer fitted with a paddle attachment, or in a large bowl using a hand mixer cream together butter and both sugars until light and fluffy.

3.  Add eggs one at a time and then beat in vanilla and almond extract.

4.  In a large bowl sift together flour, taro powder, baking soda, and salt, then add it to the wet mixture in three additions, then stir in white chocolate chips.

5.  Place about a tablespoon on batter about an inch apart on the prepared baking sheets. Bake for 8-12 minutes until the edges start to brown. Cool on sheet about 5 minutes before placing on a wire cooling rack until cooled completely.


If you would like to participate in next years cookie swap go here and sign up for notifications. :)

Tuesday, November 12, 2013

Apple Cinnamon Muffins made with Honeycrisp Apple Wheat


As a kid, fruit desserts were not my favorite. The fruit dessert that ended up showing up the most was apple pie. I would pass it up a lot of time rather than have dessert. Give me chocolate or forget it! I remember apple pie most often at my grandma’s house. My grandmother took care of me during the day as both of my parents worked. If I've said it once I've said it a thousand times, oh how I wish I had developed my love for food and baking while my grandmother was alive. She was such an amazing cook. She was the type that didn't even use a recipe, she had just made it so many times she could do it by memory, by what it looked like, and felt like. She could make anything taste good. She could make fried bologna taste gourmet. I’m sure she could have passed on a lot of knowledge on to me if I was just willing to take it all in. If only…..

As an adult, of course, my palate has changed and I have to come to enjoy a world of different ingredients, apples being one of them. This recipe actually came together when I had purchased a beer that was just a little too sweet for me, but still had a great flavor. Yeah there's beer in there. Would grandma have approved? ;)

I love this time of year! It's so nice and cool outside and I love these warm flavors. Today as I baked these muffins I had all my windows open just airing out the house. The crisp cool air combined with the warm apple cinnamon scent wafting from my oven was just heaven. That in itself just made it a perfect day. I wish I could share a muffin with my grandma. I sometimes wonder what she would think of my baking.


Apple Cinnamon Muffins made with Honeycrisp Apple Wheat

For the muffins
Ingredients:
2 cups flour
3/4 cups brown sugar
1 tsp baking powder
1 tsp baking soda
1/4 tsp salt
2 tsp cinnamon
1 tsp nutmeg
2 cups diced apples (I used 3 medium gala, but you can use whatever you have)
1/2 cup chopped pecans
1 egg, room temperature
1/4 cup butter, room temperature (half stick)
1/4 cup vegetable oil
1 cup Shock Top Honeycrisp Apple Wheat, room temperature (I used Shock Top, but if you have a different brand of apple beer, I'm sure it would work here too)
1 tsp vanilla

For the crumb topping
Ingredients:
1/2 cup brown sugar
1 tsp cinnamon
1/4 cup butter, room temperature
1/3 cup flour
1/3 cup oats
1/4 cup chopped pecans

Directions:
1.  Preheat oven to 375 degrees and spray a muffin tin with baking spray. (I use Bak-klene ZT no-stick bakery spray, it’s the best, it doesn't leave a sticky residue on my tins)

2.  In a large bowl whisk together flour, brown sugar, baking powder, baking soda, salt, cinnamon, and nutmeg. Then toss in apples and pecans to coat.

3.  In a medium bowl whisk together egg, butter, oil, apple wheat, and vanilla.

4.   Add wet ingredients to flour mixture and stir until batter just comes together and the flour mixture absorbs all the wet ingredients, then fill muffin tin 3/4 of the way full and top with a heaping tablespoon of crumb topping mixture.

5.  To make crumb topping mixture just combine all ingredients in small bowl until all are incorporated.

6.  Bake muffins in preheated oven for 15-25 minutes (mine were perfect at 20 minutes), until a toothpick comes out clean. Let cool in pan for 5 minutes, remove from pan and cool on wire rack.

Saturday, October 26, 2013

Chocolate Cookie Butter Bars


The other half is so good about his dieting self discipline...I kind of feel bad for him...that his wife bakes what he shouldn't be eating like all the time. While I was baking these bars he said I was evil and I had better get them out of the house. My co-workers, on the other hand, are very happy to have me. Because of him I now have food guilt. When I go to the grocery store with him our cart is mostly filled with fresh fruit and vegetables...when I go by myself it's sugar, chocolate, and all kinds of junk food. I keep thinking the people in line in front of me are watching me load up the conveyor belt...judging me...thinking wow what a fatty. That being said this last trip to Trader Joe's along with the cookie butter and loads of chocolate, I swear I had everything pumpkin in the store...shame or not...I was getting this...all of this!


For those of you that have not tried cookie butter yet, stop what you are doing and go to the store right now and buy yourself a jar.  It's cookie butter at Trader Joe's or Biscoff at other grocers. This stuff is so amazing that I've been found eating it right out of the jar with a spoon. Trader Joe's just came out with Cocoa Swirl Cookie Butter and I just had to grab a jar. If fact, just telling you guys about it right now made me get up and go grab a spoonful. I'm powerless against it. I knew I wanted to make some bars with it and to make these bars even better I chopped up some of their cookie butter filled dark chocolate bars and threw them in as well. You will not be disappointed!

Chocolate Cookie Butter Bars

Ingredients:
1/2 cup (1 stick) butter, room temperature
3/4 cup Trader Joe’s Cookie Butter swirled with Cocoa
1/2 cup granulated sugar
1/2 cup brown sugar
1 egg
2 tsp vanilla extract
1 3/4 cups flour
1/2 tsp baking soda
1/4 tsp salt
4 Trader Joe’s speculoos bars (cookie butter filled dark chocolate), chopped
1/4 cup sweetened condensed milk

Directions:
1.  Preheat oven to 350 degrees and line a 13x9 baking pan with foil and spray with non stick cooking spray.

2.  In a medium bowl whisk together flour, baking soda, and salt, and set aside.

3.  In the bowl of a stand mixer fitted with a paddle attachment (or using a large bowl with a hand mixer) cream together butter, cookie butter, granulated and brown sugar, until light and fluffy.

4.  With the mixer on low beat in the egg and then the vanilla.

5.  Then gradually add in the flour mixture until just combined.

6.  Turn the dough out into prepared pan and smooth out with a spatula, bottom of the measuring cup, or your hands, whatever works.

7.  Sprinkle the chopped chocolate bars over the top, pressing down slightly, and drizzle the sweetened condensed over the top.

8.  Bake in preheated oven for 17-23 minutes, mine spent 20 minutes in the oven. Then let cool completely in the pan on a wire rack before lifting out of pan and cutting.

Thursday, October 10, 2013

Cinnamon Chip Pumpkin Cookies


I love the fall season. Not that we really get a "fall" here in Texas, but I just love the weather. It's finally nice enough to go outside and do things. During the summer you have to stick to water related activities because it's just too darn hot. Right now it's great, I've been eating my lunches outside and spending more time on the patio in the evenings. Anything to keep me occupied so I don't have to do housework, that's me. My poor husband, but it's not like he didn't know what he was getting into. He was fully aware he wasn't marrying a housekeeper or a cook. Luckily I married both...I know...I'm a lucky girl.

Are you ready for some yummy fall spiced cookies?

It's like autumn exploded in your mouth.

These are pretty quick and easy for a scratch recipe. Doesn't take too long to mix them up all in one bowl. This is my new favorite pumpkin recipe. They'd be great with coffee in the morning or just a little snack. For me they're dinner. My eating habits are so horrible when the other half is out of town. I'm like a kid trying to get my hands on all the junk food possible. But this isn't junk food...it has pumpkin in it...which is a fruit...therefore it's healthy.  Like my logic?


Cinnamon Chip Pumpkin Cookies
Ingredients:
1/2 cup (1 stick) butter, softened
3/4 cup brown sugar
3/4 cup granulated sugar
1 large egg
1 cup canned pumpkin
1 tsp vanilla extract
2 1/2 cups flour
1 tsp baking powder
1 tsp baking soda
1/2 tsp salt
2 tsp pumpkin pie spice
1 cup cinnamon chips

Directions:
1.  Preheat oven to 350 degrees and line a large baking sheet with parchment paper.

2.  In the bowl of a stand mixer fitted with a paddle attachment (or in a large bowl, using a hand mixer) cream together butter and both sugars, until light and fluffy about two minutes.

3.  Beat in the egg, pumpkin, and vanilla extract, about another minute.

4.  With the mixer off add the flour, baking powder, baking soda, salt, and pumpkin pie spice to the bowl. Then start on low to stir the ingredients together and then speed the mixer up and beat until combined, then stir in cinnamon chips.

5.  Drop tablespoons of the batter onto the cookie sheet and bake in preheated oven for 12-16 minutes. (mine were perfect at 14 mins) Transfer cookies to wire rack to cool completely.

While cookies are cooling, make cinnamon glaze.

For the glaze
Ingredients:
2 cups powdered sugar
2 tsp cinnamon
4 tbsp whole milk

Directions:
1.  Whisk ingredients together until smooth and spoon glaze over cookies.

Makes 3 dozen cookies.

Thursday, September 12, 2013

Pantry Brownies


I have been in a pre-vacation coma. I haven't even gone grocery shopping. Can you believe I'm out of ice? It's just frozen water, in case you didn't know, and I don't even have that! So of course I am out of a lot of my baking staples, but that's what makes it fun right, what can I throw together that tastes delicious? That is why I call these pantry brownies because these aren't your ordinary brownie ingredients...ok so they're pretty ordinary just not the normal amount...so I just threw everything in there. We have only 1 egg, no granulated sugar, and only 3 tablespoons of butter, so I had to improvise. I thought I might as well throw all the other little odds and ends in there that have been sitting around while I'm at it. So feel free to throw in whatever you have and substitute what you need to.


Pantry Brownies
Ingredients:
1 cup brown sugar
3 tbsp butter, melted and cooled
1/4 cup coconut oil
1 egg
1 tsp vanilla extract
1/4 cup milk
1/2 cup cocoa powder
1 cup flour
1/2 tsp baking powder
1/4 tsp salt
1/2 cup white chocolate chips
1/2 cup toffee bits
1/2 cup caramel bits

Directions:
1.   Preheat oven to 350 degrees and grease an 8x8 baking tin.

2.   In the bowl of a stand mixer, fitted with a paddle attachment or in a large bowl using a hand mixer cream together brown sugar, butter, and coconut oil.

3.  Then mix in the egg, vanilla, and milk.

4.   Stir in cocoa powder until smooth.

5.  Then add flour, baking powder, and salt and mix until incorporated.

6.  Stir in what ever mix-ins you are using, for these I used white chocolate chips, toffee bits, and caramel bits.

7.   Pour batter into the prepared baking tin and bake in preheated oven for 25-35 minutes. Let cool slightly on wire rack before slicing.

Sunday, September 1, 2013

Pineapple Mango Cobbler


Yay for Labor Day Weekend!! I reeeeally needed a break from work. I'm in business banking and work with the public. Anyone that works with the public knows that it can nearly drive a person crazy after a while. It can be great but can also be stressful if you let it. You definitely learn so much about people and the way we all react to each other. There are some genuinely nice people out there and then there are some that are just...not. I know all you guys are the nice ones so you deserve a little something sweet.

I've got a quick and easy one for you for the end of summer. I am so happy for September to come along for so many reasons. The relentless heat will start to ease up a little, and hopefully a cold snap will roll through so we can start wearing some comfy fall fashions. The yummy fall flavors like pumpkin and spices are right around the corner, and what I am even more stoked about, the other half and I are going on our fall vacation.

I. Can't. Wait.


Let's get to the cobbler, shall we? It's somewhat reminiscent of a pineapple upside down cake. This little summery cobbler is full of juicy, sweet, tropical fruit and it is blended nicely with pillows of browned butter, brown sugar cakey goodness. I like to eat it warm with a little vanilla ice cream on top.


Pineapple Mango Cobbler
Ingredients:
6 tbsp butter, browned
1 cup flour
1/2 cup almond flour
3/4 cup + 4 tbsp brown sugar
1 tbsp baking powder
1/4 tsp salt
1 tbsp vanilla extract
1/2 cup milk
1 cup diced fresh mango
1 cup diced fresh pineapple

Directions:
1.  Preheat oven at 350 degrees.

2.  Place the butter into a small sauce pan and brown over medium low heat, about 10 minutes. When the butter reaches an amber color reserve 2 tablespoons and pour the rest into a 2.5 quart baking dish and sprinkle 2 tablespoons of brown sugar over that.

3.  Place flour, almond flour, 3/4 cup brown sugar, baking powder, salt, vanilla, and milk in the bowl of a stand mixer or in a large bowl using a hand mixer, and mix on medium high speed until smooth.

4.  Spoon the batter into the baking dish over the butter and brown sugar and sprinkle the mango and pineapple on top of the batter, then drizzle the reserved 2 tablespoons of browned butter and sprinkle 2 more tablespoons of brown sugar on top of that.

5.  Bake in the preheated oven for 50 minutes to an hour.

Thursday, August 15, 2013

Gooey Snickerdoodle Peaches and Cream Bars *Vegan*


Goodbye summer...at least for all the kiddos that is. Time to go back to school and time for crappy traffic in the morning again. Seriously do parents not work in the summer or what? I don't understand how the traffic situation changes so drastically when school starts. I thought most schools were in their own little neighborhood/suburb, why are the highways jam packed? This is the age old question. Traffic aside not only am I going to miss the less crowded roads but I'm going to miss all the summer flavors. I love the fresh berries, bright citrus, love watermelon, and the peaches. I heart peaches. I've been craving a sweet gooey bar for weeks now and the other half just happened to bring home some peaches from the farmers market the other day. It was destiny...peaches and cream bars had to happen.


Gooey Snickerdoodle Peaches and Cream Bars *Vegan*

Ingredients:
3/4 cup maple sugar (I found this at Trader Joe’s but have also seen it at our regular grocery store. If you use regular granulated sugar use 1 cup measurement)
1/4 cup virgin coconut oil
1/4 cup maple syrup
1/4 cup almond milk
1 tsp vanilla
2 cups flour
1 tsp baking soda
1/2 tsp salt
1 fresh peach, sliced
1/4 cup pecans
1 tbsp sugar
1/2 tsp cinnamon
1/2 cup sweetened condensed coconut milk (Recipe below)

Directions:
1. Preheat oven to 350 degrees and line an 8x8 baking pan with foil.

2. In the bowl of a stand mixer, fitted with a paddle attachment cream together maple sugar, coconut oil, and maple syrup, then stir in the almond milk and vanilla.

3. Then add to the bowl the flour, baking soda, and salt and mix until combined.

4. Reserve about a 1/2 cup (a good handful) of the dough and set aside, then press the rest of the dough into the foil lined baking tin.

5. Arrange sliced peaches all over the top of the dough, sprinkle the pecans over them, and then drizzle the sweetened condensed coconut milk all over the top, then crumble pieces of the reserved dough and dot the top of the bars with it.

6. In a small bowl or dish mix together sugar and cinnamon and sprinkle that over the top of the bars.

7. Bake in 350 degree oven for 20 to 25 minutes. The top will start to brown slightly. (Mine baked for 23 minutes)

Sweetened Condensed Coconut Milk

Ingredients:
1 (13.5 oz) can unsweetened coconut milk
1/2 cup sugar

Directions:
1. Pour can in heavy sauce pan and stir in sugar. Turn burner onto medium until it starts to bubble around the sides, then turn down to med low.

2. Set the timer for 1 hour and stir frequently to avoid burning. I stirred about every 10 minutes or so. You want to it to be thicker and reduced by about half. Let cool completely.

You can do this ahead of time and store covered in the refrigerator.

Sunday, July 7, 2013

Vegan Chocolate Chip Cookies


So the other half has been on a plant based diet recently. He really wanted to improve his health, and truth be told his best friends recent brush with cancer has totally changed his outlook on how he treats his own body. I'm all for living longer and living the life that we do have healthier so I decided to join him. There are actually amazingly delicious vegan recipes out there that we have tried and you really don't miss the meat or cheese. Don't get me wrong, we're not doing this because of the ethical reasons (i.e. animals are gross, or they are treated badly) so I am not going to kid anyone by saying I'm never eating meat again, but it isn't going to be as often and when I do I'm going to make smarter decisions about it. Anyone think I'm crazy yet? I can tell you I had a big concern about dessert though. I mean it's only obvs that I love butter and sugar ridden goodness, so would vegan desserts really stand up to what I'm used to. Well...the answer was...yes! Case in point these delicious vegan chocolate chip cookies. Now this recipe is not my own. I wanted to try it out before I start experimenting on my own...but these cookies are pretty amazing. I found them on the Vegan Housewives site and I'm so glad I did. Even if you aren't vegan you should give them a try. They are chewy and rich with a very slight hint of coconut. Yummy!


Vegan Chocolate Chip Cookies

Ingredients:
1/2 cup coconut oil
1 cup brown sugar
1/4 cup almond milk
1 tablespoon vanilla extract
2 cups flour
1 teaspoon baking soda
1 teaspoon baking powder
1/2 teaspoon salt
1 cup vegan chocolate chips

Directions:
1.  Pre-heat oven to 350 degrees

2.  Cream together the liquid coconut oil & brown sugar, then add the milk alternative & vanilla.

3.  In a separate bowl mix the flour, baking soda, baking powder and salt.

4.  Combine the wet & dry ingredients, then fold in the chocolate morsels & any other mix-ins of your choosing.

5.  Roll into Tbsp sized balls & place them on an ungreased cookie sheet, then flatten them out a bit with your palm.

6.  Bake for 7-10 minutes.

Reprinted from the Vegan Housewives

Wednesday, June 26, 2013

Glazed Strawberry Lemon Cake


It's summer and I've been craving bright, fresh, crisp flavors. Citrus and berries always remind me of warm days. What do you have planned for your summer? One new project I would like to tackle this summer is a garden. My grandmother always kept a garden when I was growing up and always had fresh fruit and vegetables around. I'd love to have one just like hers someday but I'm going to have to start on a smaller scale. The other half and I have been going to the farmer's market so regularly that it would be great to have a few staples just outside, ripe for the picking. Tomatoes here, basil there, and maybe even some onions, it would be great. One summer thing I can never seem to prepare for is swimsuit season. Yuck! I think I would like to get rid of that along with Valentine's Day. I think they are both designed to make you feel inadequate and disappointed. So hopefully the fruit and vegetables would aid in preparing for that. Are you getting what I'm saying people? This cake has fruit in it...therefore it is helping you...at least that is what I tell myself. Be good to yourself and make this cake.


Glazed Strawberry Lemon Cake

Cake
Ingredients:
2 1/2 cups all-purpose flour
1 tsp baking soda
1/2 tsp salt
2 cups sugar
1 cup (2 sticks) butter, room temperature
Zest and juice of 1 lemon
2 eggs, room temperature
1 (8oz) container sour cream, room temperature
1 tbsp Lorann Professional Kitchen - Lemon Bakery Emulsion (I use Lorann Bakery Emulsions, which I love, but any lemon extract would work here also)
3/4 cup strawberry puree

Directions:
1. First quarter a pint of strawberries and puree them in a food processor.

2. Preheat oven to 350 degrees F and prepare bundt pan. (You can grease and flour your bundt pan, but I have been using Bak-klene ZT which I got at Williams-Sonoma. The best no-stick bakery spray I have ever used. Helps save your bakeware because it doesn’t leave a sticky residue.)

3. In a medium bowl whisk together flour, baking soda, and salt. Set aside.

4. I the bowl of a stand mixer, fitted with a paddle attachment, cream together butter, sugar, and lemon zest. Add eggs one at a time, beating after each one until incorporated. Mix in Lorann Lemon Emulsion and sour cream.

5. Add flour mixture a little at a time until flour is combined. (I did it in three batches)

6. Stir in strawberry puree.

7. Pour batter into prepared pan and bake for 45-55 minutes. Until a cake tester or a toothpick comes out clean. Let cool in pan for 10 minutes before turning out on cooling rack to cool completely.

Glaze
Ingredients:
2 cups powdered sugar
2 tbsp strawberry puree
1 tbsp + 2 tsp lemon juice

Directions:
1. Combine all ingredients into a medium bowl and whisk until smooth.

2. Drizzle glaze over cooled cake.


Wednesday, May 22, 2013

Doughnut Pudding with a Whiskey Ice Cream Sauce


I am living out of boxes right now and it stinks...but...we're moving...YAY!...so it's worth it! We're moving to a new place and we're finally getting more space. The kitchen is so much bigger and brighter and I can't wait to get in there and make a mess. There is no better way to realize you may have hoarding tendencies than having to pack up all your crap. So because the other half is awesome and packed up all the kitchen stuff I have been forced to eat out more often and that includes breakfast. I was craving a doughnut and I felt if I get a doughnut for myself I should bring enough for the rest of the class so I got enough for the office. Too much in fact...but don't worry...no wasting sweets here.

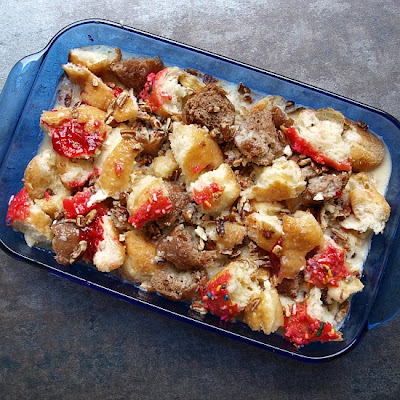
Don't know what to do with those left over doughnuts from work this morning? Don't throw them away, save them and make some doughnut pudding, it's like bread pudding made with doughnuts instead. So much prettier too..especially if you include some sprinkle topped ones and jelly filled...so colorful.

Just take some old doughnuts.

Tear them up

Then pour a sweet custard over them...bake...and voila...Doughnut Pudding!
Better than bread


Doughnut Pudding with Whiskey Ice Cream Sauce

Ingredients:
6 day old doughnuts, torn into chunks
1 1/2 cups milk
3 eggs
1/2 stick butter, melted
1 tsp vanilla
1/3 sugar
1/2 cup pecans, chopped

Directions:
1.  Preheat oven to 350 degrees and grease a 13x9 baking dish.

2.  Place torn doughnuts in a greased 13x9 baking dish and sprinkle chopped pecans over the top.

3.  In a medium bowl whisk together eggs, milk,vanilla, sugar, and melted butter that has cooled.

4.  Pour the wet mixture over the doughnuts and let soak in about 10 minutes.

5.  Bake for 35-40 minutes.

6.  For the whiskey ice cream sauce just melt 1 cup of your favorite vanilla ice cream with a tbsp of whiskey and you're all set.

Friday, May 10, 2013

Mini Amaretto Peach Pecan Honey Butter Cheesecake


Hello hello :) So the other half and I recently took a trip to Seattle and Portland and I loved it there. I could totally see us moving there and hopefully we will someday. It's such a beautiful part of the country and it wasn't really as rainy as I thought it would be. We ate and drank our way through both cities trying to explore as much as we could. When we vacation we walk and ride public transportation to get around the city trying to find the local spots, and for the most part avoiding the touristy places. If you could live anywhere, where would it be?

Here are a few photos from our little adventure.


Moving right along to the cheesecake. I had a few ingredients that I had been wanting to use and finally brought them together. First, I had a jar of Amaretto Peach Pecan Honey Butter that my girlfriend had given me because she knows I love that sort of thing and I have been trying to come up with the perfect treat to use it in. Then I also decided to go with a shortbread cookie as a crust because the other half sucks at picking out girl scout cookies. They have been sitting around the house since "girl scout cookie season" (you guys know what I mean) unopened and they just had to be put to good use. His excuse for acquiring said girl scout cookies...he believes that the girl scout cookie selling operation is like the mafia. You see they put these cute little girls in pigtails as a front. They smile sweetly and ask if you'd like to buy some cookies, when it's really the mom's that are behind it. Their icy stare, judging you (like how dare you say no to a little girl), with the look in their eyes that say, (you better buy some cookies or I'll break your freakin legs.) My technique is to not make eye contact, but the other half, he just doesn't have it down yet. So while feeling coerced into buying cookies he goes and picks the most plain, boring cookie they've got. (No offence to you shortbread cookie lovers) I think they go great with a creamy, rich cheesecake though.


Amaretto Peach Pecan Honey Butter Cheesecake

Ingredients: 
2 (8oz) packages cream cheese, room temperature
1/2 cup brown sugar
1 tablespoon flour
2 large eggs, room temperature
1/2 teaspoon vanilla extract
1/2 teaspoon almond extract
1/4 heavy cream
1/2 cup Amaretto Peach Pecan Honey Butter
Pinch of salt
12 shortbread cookies for crust

Directions:
1.  Preheat oven to 325° and line a muffin tin with liners and then place one shortbread cookie in the bottom of each tin.

2.  In the bowl of a stand mixer, or in a large bowl using a hand mixer, cream together the cream cheese, brown sugar and flour until smooth.

3.  Then add eggs one at a time, beating until incorporated.

4.  Then stir in the amaretto peach pecan honey butter, heavy cream, and vanilla. Pour into tins.

5.  Bake for 25 minutes. (I place a pyrex baking dish full of hot water underneath the muffin tin; I do this for all of my cheesecakes instead of a water bath) Turn off oven and leave cheesecake in oven with the door closed for 30 minutes.

6.  Remove from oven. Let cool. Chill for at least 2 hours before serving.

Thursday, March 21, 2013

Chocolate Cookie Butter Tart


So I love Trader Joe's cookie butter. What I love more than their cookie butter is the cookie butter (speculoos) stuffed chocolate bars...like really LOVE! In fact I think I have a problem. They were so good I would always get a couple or three or four when I checked out, and then they ran out! The next month or so they had not gotten any in, so I did what any addict would do, I improvised. I bought a jar of the cookie butter and a bar of chocolate and dipped my chocolate bar in the cookie butter, perfectly healthy I assure you. I had to manage my cravings this way for a while until they finally got them back. Now I just rake them all in my basket with my arm and hope the cashier doesn't judge me for how many chocolate bars I am buying. So in honor of my favorite candy bar and to use the extra jar of cookie butter I bought in crisis, I decided to create this tart.


This definitely satisfies the chocolate/cookie butter craving, thank goodness so I don't have to buy so many chocolate bars. It's a crumbly chocolate shortbread crust that also has crushed speculoos cookies baked into it, with a creamy cookie butter middle, and topped with a smooth chocolate ganache. It's so good! It is rich so a little piece will do or you can pair it with a little whipped cream or maybe even a little ice cream.


Chocolate Cookie Butter Tart

Shortbread Crust
Ingredients:
1 cup flour
1/4 cup cocoa powder
1/4 cup speculoos cookies, crushed (plus extra for garnish)
pinch of salt
1/4 cup powdered sugar
1 stick unsalted butter, room temperature
1 large egg yolk, room temperature
1/2 tsp vanilla extract

Middle Layer
Ingredients:
7 oz (1/2 jar) Trader Joe's crunchy cookie butter (that's it)

Chocolate Ganache
Ingredients:
3oz milk chocolate, chopped
2oz dark chocolate, chopped
3/8 cup heavy cream

Directions:
1. In a medium bowl mix together flour, cocoa powder, cookies, and salt.

2. In the bowl of a stand mixer fitted with a paddle attachment (or large bowl using a hand mixer) cream together butter and sugar until light and fluffy, then beat in egg yolk and vanilla.

3. Add the flour mixture to the wet ingredients and mix until it comes together.

4. Press into a 9in' tart pan and refrigerate for 30 minutes.

5. Preheat oven to 350 degrees and prick the bottom of the crust several times with a fork. Bake in preheated oven for 18-22 minutes. Cool on wire rack.

6. While crust is cooling, start on ganache. Heat cream in saucepan over medium heat just until the sides start to bubble.

7. Pour the hot cream over the chopped chocolate and let set 2 minutes, the whisk until smooth.

8. Spread cookie butter over cooled crust then spread ganache over cookie butter, sprinkle extra cookie crumbs as garnish. Refrigerate until ganache is set.

You can serve it at room temp like I did or with a bit of a chill on it, whatever you like.

Monday, February 25, 2013

Truffle Stuffed Amaretto Peanut Butter Cookies


So...I was going to lay off the alcohol for awhile...to you know save calories and give my liver a good rest...

Then Monday came along...

I think they might have invented alcohol for Mondays just to make them worth being a day of the week. Plus it's blowing like 50 mph chilly winds today...no kidding...so what's better than a nice glass of red wine to warm your cockles. Oh and good for your heart! Right?

Anyway...lets talk cookies. These will make your Monday worth it too.

These cookies are chewy and amaretto-y and peanut buttery, and chocolatey, and positively scrumptious. I made these cookies with an amaretto peanut butter and stuffed them with an amaretto truffle. I love amaretto and my girlfriend, Randi, knows this and got me a few treats, including this amaretto peanut butter, she's the greatest!

And I just realized that I was supposed to save one for her...and I didn't...I forgot...and they're all gone...I'm a horrible friend.

Guess I'll be making another batch soon...must save one for Randi...must save one for Randi. :)


Truffle Stuffed Amaretto Peanut Butter Cookies

For the Amaretto Truffle
Ingredients:
1/3 cup + 1 tbsp heavy cream
3 ounces dark chocolate coarsely chopped
3 ounces milk chocolate coarsely chopped
1/4 cup amaretto

Directions:
1. Place the heavy cream in a small saucepan over medium heat until scalding; it will just start to bubble around the sides.

2. Place the chopped chocolate into a heat proof bowl and pour the hot milk over the chocolate and add the amaretto, let sit for 2 minutes and whisk until smooth.

3. Cover with plastic wrap and chill in the fridge for two hours or until set. Then form into balls. For the cookies I made them a little smaller and I left the truffles without any coating but I did roll a few extra in cocoa. Chill in fridge for another 30 minutes.

For the Cookies
Ingredients:
3/4 cup packed brown sugar
1/4 cup granulated sugar
1/2 cup butter (1 stick), softened
1/2 cup amaretto peanut butter
1 egg
1 tbsp amaretto
1 1/4 cup all-purpose flour
1/2 cup almond flour
3/4 tsp baking soda
1/2 tsp baking powder
1/4 teaspoon salt

Directions:
1. Preheat oven to 350 and line baking sheet with parchment paper or silpat liner.

2. In the bowl of a stand mixer, or in a large bowl using a hand mixer, cream together the sugars and butter until lighter in color and fluffy.

3. Beat in egg and peanut butter until smooth and stir in amaretto.

4. Add the rest of the dry ingredients and mix on low until all ingredients are combined. Then chill dough in fridge for 30 mins.

5. Now to assemble the cookies I used a small cookie scoop I used two scoops and smashed one down with a fork to give it the traditional peanut butter cookie look and then I just smashed the other down with the palm of my hand and wrapped them around one of the amaretto truffles and pinched the sides together to seal.

6. Bake in the preheated oven for 12 to 14 minutes and then let rest on cookie sheet for 5 minutes, then transfer to wire rack to cool completely.

Saturday, February 2, 2013

Super Gras and a King Cake

This is what happens when two amazing things like Super Bowl and Mardi Gras collide.


The other half and I took a little weekend trip to New Orleans last weekend and were inspired to add a little Mardi Gras flair to our Super Bowl party. He's making homemade gumbo with shrimp and andouille sausage, and I decided on a classic king cake with a twist.


It was my first time in New Orleans and I loved it. I have to admit, I didn't have high hopes for it. From what I had heard it was just a trashy, dirty city that smells bad, but that couldn't be further from the truth. The city has cleaning up after the festivities pretty much down to an art, and when they are done it actually smells quite nice. We stayed off of Canal St across the street from Harrah's.  We did spend some time in the casino but took plenty of time to explore the city and walk around the streets. The city has an old charm about it. I love the old houses with balconies on every one, the small bars that invite you in from the street, oh and the food. The food is amazing. The city had such a great buzz about it. All the major networks were already set up for broadcasting from there for Super Bowl week, and we were able to see three different Mardi Gras parades, one at night, one during the day, and one for dogs actually. Did I mention the food? We had shrimp and grits, gumbo, ettouffe, poboys, alligator sausage, boudin, and of course some beignets and chicory coffee at Cafe Du Monde. So A-mazing!

I chose this particular recipe for the cake because it uses bread flour which gives it a less dense texture, and for the technique of making the dough in the food processor, it was super easy. The only thing you need to be aware of is that this has a lot of inactive prep time. Because it is made with a yeast dough it has a lot of rising and kneading, and rising, and rolling out, and rising again. So make sure you are giving yourself enough time to make this. I made my filling using an ingredient I picked up in New Orleans. The other half and I stopped into a shop, the Pepper Palace, where he had picked up a few things for me last time he was there. You may have seen them used in previous post, cherry butter in the Cherry Butter Cheesecake, and candied jalapenos in the Candied Jalapeno Brownies. For this visit I picked out a jar of peach butter.


King Cake with Peach Butter Cream Cheese Filling

For the Cake
Ingredients:
1/3 cup milk
1 package active dry yeast
2 1/2 cups bread flour, plus more for dusting
2 large egg yolks, plus 2 eggs
3 tablespoons granulated sugar
Finely grated zest of 1 lemon
1 teaspoon salt
1/2 teaspoon freshly grated nutmeg
1 1/2 sticks unsalted butter, melted and cooled, plus more for greasing the bowl

Directions:
1.  Heat the milk in a saucepan until scalding; transfer to a food processor, add the yeast and pulse to combine. 

2.  Add 1/2 cup flour and the egg yolks; process to combine. Pour the remaining 2 cups flour evenly over the yeast mixture; do not process. Put the lid on; set aside for 90 minutes.

3.  Add the 2 whole eggs, granulated sugar, lemon zest, salt and nutmeg to the food processor; process to make a slightly textured dough, about 1 minute. 

4.  With the machine running, slowly add the butter to make a smooth, sticky dough. Transfer the dough to a lightly buttered bowl and cover tightly with plastic wrap; let rise in a warm place for 2 hours. 

5.  Turn the dough out onto a clean surface and knead about 8 minutes; form into a ball and return to the bowl. Cover with a moist tea towel in a warm place to rise for another hour. Meanwhile make the filling.

For the Filling
Ingredients:
1 package (8oz) cream cheese
3/4 cup packed dark brown sugar
1/4 peach butter (from Pepper Palace in New Orleans)
1 teaspoon vanilla extract
1 teaspoon ground cinnamon
1/4 teaspoon salt
2/3 cup toasted pecans, chopped

Directions:
1.  In the bowl of a stand mixer fitted with a paddle attachment or in a medium bowl using a hand mixer beat cream cheese and brown sugar until smooth then scrape down the bowl. 

2.   Add peach butter, vanilla, cinnamon, and salt and beat until incorporated. Then stir in pecans.

To Assemble the cake:
1.  On a floured surface, roll the dough into a 20-by-7-inch rectangle, with the long edge facing you. Spoon the filling in an even layer over the dough, leaving a 1-inch border along the top and bottom. 

2.  Fold the bottom and then the top edge over the filling to make a tight roll; pinch to seal. 

3.  Transfer the roll seam-side down to a parchment-lined baking sheet; tuck one end into the other to form a ring. Cover loosely with a tea towel and set aside in a warm place until the roll doubles in size, about 2 hours. (I placed a coffee can in the middle of the cake so it would not lose its shape)

4.  Preheat the oven to 350 degrees. Bake the cake until firm and golden brown, about 30 minutes. When cake comes out carefully press the plastic baby into the underside of the cake. Cool on a rack.

For the Glaze
Ingredients:
1/2 cup confectioners sugar
1 tablespoon  peach butter
1 tablespoon milk

Directions:
1.  Whisk together all ingredients and drizzle over cooled cake, then sprinkle green, purple, and yellow sugar over glaze.

This recipe adapted from the Food Network.

Friday, January 25, 2013

Browned Butter Cupcakes with Fig Swiss Meringue Buttercream and Fig Filling


Did I totally miss my blogiversary? Yes, yes I did. Gawd! I'm like a man! It's been two years since I started this little blog and I totally missed it. Does it count that I made these totally awesome cupcakes a week later? Well it should because these cupcakes are definitely worthy. They smell so delicious even before they bake because of the browned butter. I actually ended up creating this recipe on accident.


You see I attempted to make my very first batch of macarons. Unfortunately, I have not perfected the technique yet. I need more practice. You can see large grains of the almond flour in the cookie. They tasted wonderful though.

I used the italian method. Check out my fail and let me know if you have any tips.


So...I had whipped up a batch of amazingly delicious fig butter swiss meringue buttercream and had quite a bit left over....so I had to do something with it....I couldn't just eat it out of the container off the spoon....ok....so I do that too...it just seemed destined for better somehow.

So I came up with these...your're welcome.


Browned Butter Cupcakes with Fig Swiss Meringue Buttercream and Fig Filling

CUPCAKES
Ingredients:
1/2 cup browned butter
1/4 cup vegetable oil
1 cup brown sugar
3 eggs
1 1/4 cups cake flour
1/2 teaspoon baking powder
1/4 cup milk
1 teaspoon vanilla extract

Directions:
1.  Pour glass of wine, set aside for yourself. Baking with a glass of your favorite beverage always makes it better.

2.  First brown the butter in a small sauce pan. (I started on low and gradually raised the temperature little by little, swirling occasionally, until the milk solids started to turn brown and it started to smell nutty.)

3.  Then place the browned butter in an ice water bath. (You can do this early and let it cool completely on the stove or use a water bath, which ever you prefer. I let it cool in an ice bath in the sink and let it sit there while I got everything together and preheated the oven.)

3.  Preheat the oven to 350 degrees. Prepare baking tin with cupcake liners.

4.  In the bowl of a stand mixer fitted with a paddle attachment, cream the browned butter, vegetable oil, and brown sugar together until light and fluffy.

5.  Beat the eggs in one at a time then scrape down the bowl. Add the vanilla, milk and mix. Then add the cake flour and baking powder.

6.  Mix until batter is smooth. Then pour evenly (I used a ¼ cup measure) into prepared cupcake tin. Bake for 12-17 minutes until a toothpick or cake tester inserted in the middle comes out clean. (In my oven, mine came out perfect at 15 minutes)

7.  Let cool in pan for 5 minutes before removing them and letting them cool completely on wire rack.

FILLING
Ingredients:
1/2 cup or so Fig Butter (I used Trader Joe’s)
Slash of apple juice

Directions:
1.  Core the middle of the cupcake out to make room for the filling. (I used my nifty cupcake corer, love it, but you can also just use a paring knife.)

2.  Add a splash of apple juice to the fig butter to thin it out just a tad and then put it in a large ziplock bag and snip off the corner of the bag to just pipe in the filling.

FIG SWISS MERINGUE BUTTERCREAM
Ingredients:
5 large fresh egg whites (150 g)
1-1/4 cup (250 g) superfine granulated sugar
1-1/2 cups (340 g) (3 sticks) unsalted butter, softened, cut into cubes
2 teaspoons (10 ml) pure vanilla extract
Pinch of salt
1/4 + 1/8 cups fig butter (I used Trader Joe’s)

Directions:
1.  Add egg whites and sugar, and simmer over a pot of water (not boiling), whisking constantly but gently, until temperature reaches 160°F, or if you don't have a candy thermometer, until the sugar has completely dissolved and the egg whites are hot.

2.  Place bowl back on mixer and fit with whisk attachment. Whip until the meringue is thick, glossy, and the bottom of the bowl feels neutral to the touch (this can take up to 10 minutes, or longer).

3.  Switch over to paddle attachment and, with mixer on low speed, add softened butter in chunks until incorporated, and mix until it has reached a silky smooth texture (if curdles, keep mixing and it will come back to smooth).

4. Add vanilla, salt, and fig butter and continuing to beat on low speed until well combined.

Swiss Meringue Buttercream Recipe reprinted from Sweetapolita

Friday, January 18, 2013

Mint Chocolate Irish Cream Cookies

So now that it's a fresh new year, I have no motivation.

Except to eat more cookies like these.


Let me tell you guys just how bad my motivation has been lately. I experienced something this morning that I haven't done since, oh I don't know, junior high. It all starts with the fact that I can't even make myself go to bed at night. I sit on the couch and keep busy on my iPad or catch up on my shows (so happy Downton Abby is back on) until I literally fall asleep on the couch. Sometimes it's just a quick thirty minute to an hour that I'm asleep before I get up and put myself to bed and then there are times I'll wake up at four in the morning before I make it to the bedroom. Usually I'm pretty good at getting up in the morning and going to my grown up job, but all good things must come to an end. Last night I took my usual nightly nap on the couch, only for about an hour, but this time I forgot to set my alarm! (Oh the horror!) Have you ever shot up out of bed just knowing you were already late? It's terrible isn't it? That oh my god, oh my god, I slept in feeling. I swear I ran back and forth at the foot of the bed about ten times trying to get my bearings and figure out what to do. I threw on some clothes, brushed my teeth, smeared on some makeup, and tried to make my birds nest of a hair do look halfway decent, to no avail. Believe it or not I actually got to work in the nick time. My punishment, having to drink the bitter nastiness they call coffee and having to face the morning in a zombie like coma. Luckily I survived the day and decided to bake cookies and drink wine to make myself feel better. Even better the cookies have liqueur in them too. 

If you are wanting a comforting hug at the end of a long tiring day, these cookies are for you. The hint of mint and irish cream soothes you just like a warm after dinner drink with a shot of Bailey's. Try em out. :)


Mint Chocolate Irish Cream Cookies

Ingredients
1 1/2 cups flour
1/2 tsp baking soda
1/8 tsp salt
1/2 cup (1 stick) butter (room temperature)
1/2 cup brown sugar
1/4 cup granulated sugar
1 egg
1 tsp vanilla
1/4 cup Irish Cream (I used Bailey’s Chocolate Mint Irish Cream, but any flavor will work)
1/4 cup Andes crème de menthe baking chips
1/4 cup chocolate chips

Directions
1.  In a medium bowl whisk together flour, baking soda, and salt.

2.  In the bowl of a stand mixer fitted with a paddle attachment cream together butter and sugar until pale, then add the egg and vanilla and beat until light and fluffy, then with the mixer still on drizzle in the irish cream. Scrape down sides to make sure all is incorporated.

3.  Then add flour mixture and mix on low until just combined, and then stir in Andes baking chips and chocolate chips.

4.  At this point I stash them in the fridge to get a chill on them while I clean up and preheat the oven and prepare the baking sheets.

5.  Preheat oven to 350 degrees and line baking sheet with parchment paper or silicon baking mat. Place tablespoons of dough on the baking sheet leaving enough room for spreading. I use a small cookie scoop. Bake for 8 to 10 minutes, just until they start to brown around the edges.

6.  Cool on sheet for 5 minutes then transfer to cooling rack to cool completely.

Store uneaten cookies (yeah, like that ever happens) in an air tight container. ;) Enjoy

Friday, January 4, 2013

Happy New Year!

Finally! All that hustle and bustle of the holidays is over and we can chill out and relax a bit. Now that I don't have a million things to do a day I've been getting to reflect back on the year and really enjoy the memories. 2012 was a great year for me. Full of love, new experiences, and challenges. 

This year I turned 30. 

I married my best friend. 

Took a beautiful vacation to California.

and I ran a 1/2 marathon.

All of which were pretty big for me. I can reflect back and feel like I really lived life well. I can't wait to see what 2013 has in store for me. 

So while I am reflecting back, I wanted to share the top five most popular posts of 2012 with you guys and then I wanted to share my favorite top five recipes (ie: what I couldn't resist stuffing in my face)


Print

Related Posts Plugin for WordPress, Blogger...